Inexpensive DIY Plexi Frame

March 21, 2013


I felt super lucky when we moved into our home in 2007 and found the original blue prints had been left for us, by every previous owner.  Thanks owners!  There are about 10 pages total and my original thought was to frame them up and hang them going up the stairway.  Ummm, have you ever had to frame 10 things?  It is not cheap.  No no, not cheap at all.  I needed a budget-friendly option.  I also wanted to pick something that would preserve the prints.  One day I may move from this house, and I want to leave the prints for the next lucky family and take the frames with me.  Enter this DIY plexiglass option.

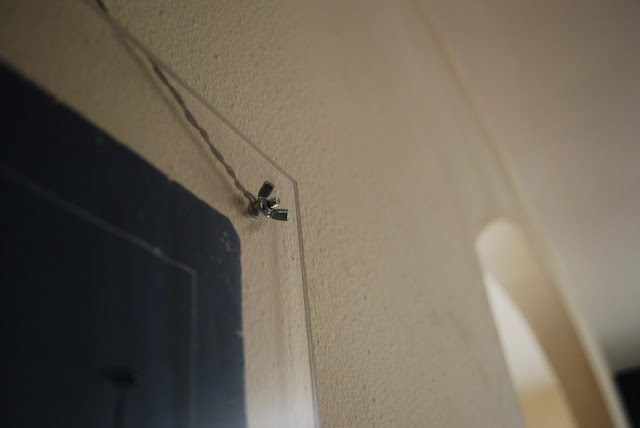
I ordered 4 total pieces of .118"thick plexi from Midland Plastics here in Madison.  They were recommended to me, but I'm sure each medium-ish to large city has a plastics shop like this.  I made sure to put 2 pieces of the plexi together before I drilled the 4 corners, so that the holes would line up perfectly.  I can't remember which size drill bit/screws I used but I do remember that took some thought and planning.  Also, take note of the border size.  Normally I love framing with HUGE mats.  The bigger the better, but that does not hold true for this method.  A border that is too big just looks weird.  Learn from my mistake.  The border here is 1.5 inches which I think is perfect.  That's enough room for the print to breathe between the screws.


Each corner was fixed with a screw and a wing nut.  You could also use a regular nut, but I liked the industrial feel of the wing nuts, especially with the architectural prints, it made sense to me.  I did use a few little glue dots to secure each print to the plexi so they don't slip down over time.  Now, if you're really on a budget, you could just use one sheet of plexi and actually screw it into the wall, though that seemed a little destructive and a bit too permanent for me.  The final step is picture wire.  Do I need to explain that?  I'm horrible at instructions.  You just kindof twist it around.  How's that?


2 down, 8 to go.  I am on a roll.  Hello Katie in a white button down perched against the wall so the camera doesn't shake.  How to photograph these?  I did/do not know.  I really wish I was a better photographer.  It's probably the skill I would most like to improve at some point.


Thank you Mr & Mrs L.N. Trachte of Lakewood Blvd.  Your name I do not know how to pronounce but your thoughtfulness I do know how to appreciate.

Also, I have two other posts about inexpensive framing options here and here.  

The Vintage Dollhouse

March 16, 2013


I'm so sad this blog has sat still for so long.  I actually have a lot to share, but not a lot of time for documenting so I'll just do what I can, when I can.  I'm honestly not sure I can remember how to insert and re-size the pictures correctly but here goes.


This post is about a dollhouse I made over for my girl's Christmas present.  It's one of 2 dollhouses my dad made for my older sisters when they were little.  Of course, I didn't take a before picture, but just envision a dirty white old dollhouse, still charming but in need of love.


Most of the furniture was re-used from the old set.  A lot of it I painted and generally updated.  I used a "fat quarter" of darling Liberty of London printed fabric for the window treatments and bedding.  The prints are so cute and the scale was perfect.  I did buy a new kitchen set with appliances and a dinette set (do people still say that? dinette?)  Anyway...that purple chair/ottoman, side table and couch were handmade by my mom.  I never stop being impressed by her skills.  I spent a month updating this piece and my mom and dad spent a few weeks building/making/sewing everything pretty much from scratch (times two.)  Impressed.


The living room is my favorite.  Like I said, my mom made that couch, chair and ottoman.  I re-covered the couch in the liberty print and re-painted the fire place (which she also made, I think) with chalkboard paint.  The framed print is just a fabric scrap and I also made the matching drapes.  The rugs in the house are grasscloth cut to fit and trimmed in ribbon.  Yep, this family of orphans went custom.  The only "people" are 2 babies, one school-aged child and a teenager.  The mom and dad were headless.  Not a fun thing to see on Christmas morning so I left them out.

I wanted to paint a few of the back walls, besides the attic playroom which went pale coral pink, all the walls are currently white.  I planned to do the kitchen turquoise and the bathroom in the same bright coral pink from the front door and shutters.  The roof and chimneys were originally red but I re-painted them in the dark grey chalkboard paint.  I think I planned to draw on scalloped shingles but I forgot about that until just now while I was typing this.


Forgive some of the photography.  These rooms were super hard to shoot.  This room needs some paint on the wall,  but I love the color the little curtains and picture added.  The rug is made from Polly's old roman shades from her nursery.  This liberty fabric was my favorite from the group.


The navy curtains and bedding are original to the home, circa 1970 with a simple addition of some new liberty accents.  The bed is pretty messed-up, it has no legs.  I was going to try to use screws instead and paint them white but I ran out of time.  I should have painted the wardrobe a fun bright color but didn't work that out in the planning phase.  This is the second custom grasscloth rug.


This young lady is the oldest child in the house.  She's the responsible older sister.  She reads the paper and eats cake for breakfast.  How cute is that ruffled curtain?  I made that, and my mom made the chairs and upholstered them.


Ha, the scale is a bit off between the cradle and the twin beds.  The cradle is actually bigger than the beds.  Oh well.  The curtains in this room look a lot like Liberty but they are actually original.  I added the little orange ball-trim.  I always wanted an attic playroom as a kid.  Something about them just seemed magical to me, I don't know.  These kids got one and it's pretty cute, too.

Looking at these, I'm reminded of all the things I planned to do but didn't but I still think it turned out pretty cute.  I try hard not to over-parent when she plays with it.  I only cringe a little when she moves everything around, but I do always clean it up back to the way I like it when she's done.  Merry Christmas, Poll doll.  P.S. Happy March!
signature

polaroid transfer

May 31, 2012


I really love the dreamy vintage look of polaroid transfer prints.  I ordered my Daylab 200 on Ebay years ago after taking a class at Paper Source in Evanston, Illinois, and have decided that it's time to pass on this piece of historical technology as I organize and prepare for a big neighborhood garage sale.  Since I knew the Daylab was leaving me, I decided to give it one last go and had fun making some prints from old family slides.  I kept a few and gave some as gifts to family members, truly one-of-a-kind gifts.  You can find polaroid transfers for sale on Etsy, but they are not always originals, sometimes they are prints of originals, which don't have the same luster as the real thing, in my opinion.  I also found this shop which will make a polaroid transfer print for you if you send in a slide, how cool.  


Come by the neighborhood garage sale on Saturday June 16th if you're interested, the set will be priced at $75 which is a steal from what I paid for the Daylab, the base, brayer and some watercolor paper.  If it doesn't go, I'll list to Etsy.
signature

diy wrapped rope necklace

May 14, 2012


Several months ago, I became obsessed with a certain very expensive wrapped rope necklace.  I don't really feel right showing the particular brand I hacked because it is an original design, I didn't use all the same materials, so it's not an exact copy.  If you're crafty, the coveted necklace is somewhere in my pinterest, probably in the style section.  I actually waited to post this because I felt a bit bad about hacking it at first but then I saw a million other D.I.Y's, and some knock-off brands online so I didn't feel so bad.  The original necklaces are in the $200-$500 range, and I'll admit this is definitely a step down BUT, it was a super easy, fun, inexpensive and rewarding project.  I got the rope from the hardware store, and while I was there also found these brass "sleeves" used for plumbing projects.  There are different sizes of rope and sleeves so make sure you get 2 that work together, the sleeves should fit snugly just over the rope.


Picking out the embroidery thread was the hardest part, I stood at the craft store for probably an hour putting different colors together, putting some back, taking more, putting more back, taking more, it's really easy for me to second-guess myself but I am happy with the combo I came up with.    I made a necklace that can be worn long or shorter, so that I wouldn't have to make a clasp.  The first step is putting the brass sleeves on the rope and attaching the ends together.  I actually "burned" the ends of the rope then stuck them together using tinfoil to kindof smash it so I wouldn't burn my hands.  Where the melon color meets the white you can see a larger "bump" where the seam is (below.)  The next step would probably be planning for you type A's but I just went to town wrapping my necklace with the embroidery thread and switched colors as I pleased, tying knots under the brass sleeves.  I love the texture that the rope gave the necklace, that wasn't planned but was a happy accident.
Sorry, describing processes is not my forte but anyone has any questions, I'd be happy to answer them in the comments section.  Let me know if you make one, I'd love to see!


signature

doctored up old paintings and lauren moffatt

May 07, 2012


Did any of you check out the April issue of Lucky Magazine featuring clothing designer Lauren Moffatt's home? I received this magazine in the mail in March and I haven't stopped thinking about Miss Moffat's "doctored" paintings, aren't they darling?  She hit it on the mark with the colors and I love that she took something discarded and dated and made it fresh and so, so pretty.  I have a lot of oldish original painted art in my home but I already like it all for different reasons so I was scared to try this with anything I already owned.


I found this diamond in the rough at St. Vinnie's on Saturday.  I really liked the flowers, I think they're magnolias, but the black/red background was not doing it for me, and the leaves looked a little forest-y, so I decided to try my hand at customizing it to suit my tastes.  It was under $10 so if I flubbed it up, it would just go right back to St. Vinnies and I could call it a double donation.  I've been obsessing over the pinkish/orangish melon/coral color for the past year or so, and I've been wanting to incorporate it more into my home so I mixed up some acrylic paint and went to town.


It's definitely a step in the right direction but I'm not totally sure about it yet.  My husband is on board, he likes the color, but it might be a little too "crazy lady" I think I may need to tone it down. I also might make the leaves more chartreuse, since that color works better with the coral than this forest-y greenery.  This image from Martha Stewart might work as an inspiration.  I painted the entire black background white first before the coral, I was afraid of painting directly on the dark.  Even with those 2 steps, the whole project only took about an hour.  The different shades of coral are actually a happy accident, I kept running out of paint and each time I re-mixed it, a new and different shade appeared, but I like the depth it adds. 


Oh and by the way, I really love Lauren Moffatt's line.  Check out her presentation for Fashion Week, it's not a runway show but an installation of sorts called The Old School for Wayward Girls.  Look closely and you can see some of the paintings from Lauren's home hanging on the wall.  This video was made by Jeff Hendricks.  I was introduced to this brand in 2004 and have noticed over the last 8 years that her brand has a suuuuuuuper strong point of view, it's very vintage, pretty, detailed and feminine, with lots of muted colors and also bright colors paired with beiges and creams and pretty little prints, oh and lots of gold details like buttons and zippers.  If you're interested in her collection, you can find it on her website, and also a cutie-pie feature on her at home with her daughter Stella on the Glow here.
signature

newly painted dining room and upholstered shield back chairs

April 30, 2012


What have I been doing for the past three months?  Painting my dining room...with an artist's brush, just  a few tiny strokes per day.  Actually, I've been working out of the home since the beginning of February but I did paint my dining room during my hiatus.  I am in absolute love with the color.  It's called Deep Sea Depths by Benjamin Moore.  I had it color matched to Sherwin Williams Duration paint because I like it and I get a family employee discount there.  My husband actually did most of the painting, it was his birthday present to me.  He's a really great cutter-inner, much more patient than I am.  Here's what it looked like before.


I've also been working on my dining room chairs.  I bought them just a little over a year ago, I actually have two sets of shield-back chairs for a total of 11.  I have 6 completed and plan to finish at least 2 more to flank the buffet.  I'm not sure if I'll keep going after that or not, they're labor intensive, and I'm not convinced it's really worth all that work for the (very seldom) occasion that I have more than 8 people seated 'round my table.   I may go into more detail about how I upholstered them (inspired by a Pure Design episode) if anyone is curious.  I didn't take process photos but I could with the next few.


The balloon centerpiece and chinese lanterns are left over from a birthday dinner I threw for a few friends last weekend.  Hosting the celebration was what helped me get in gear to finish up the chairs and paint, I work well with under pressure.  Now I need a new deadline for my next round of to-do's.  Anyone have a birthday or any other special occasion coming up?

signature
Related Posts with Thumbnails